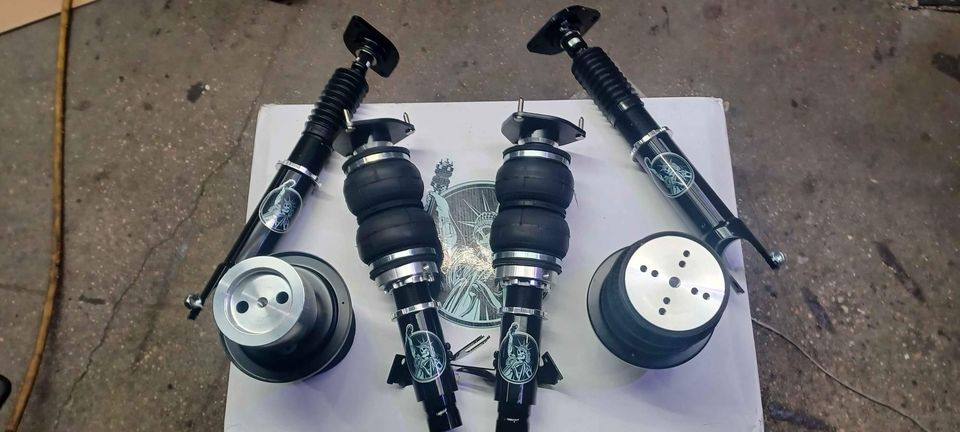
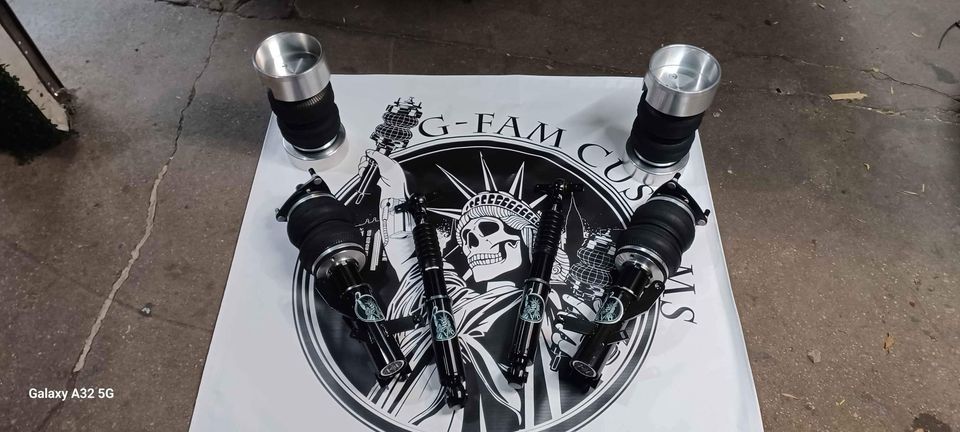
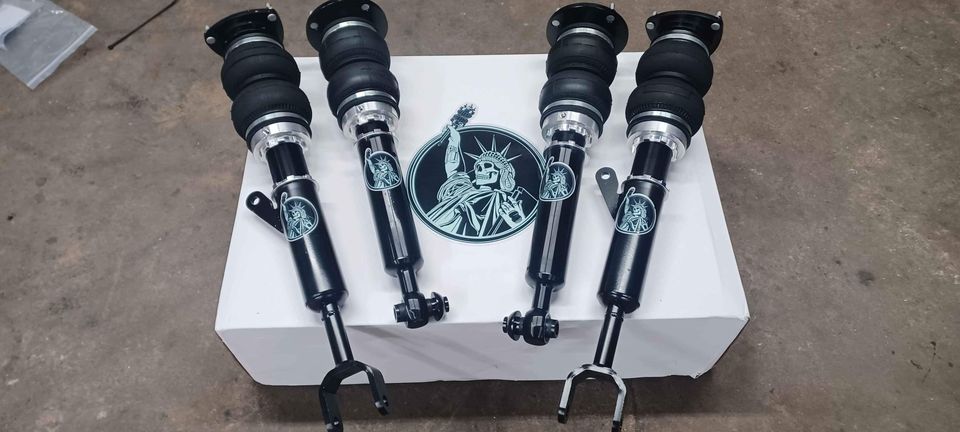
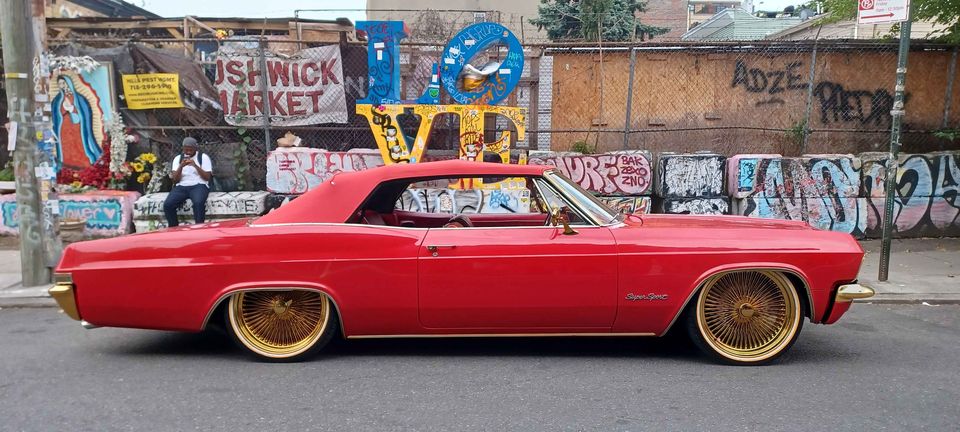
2006-2011 Cadillac DTS Weld-in Third Brake Light Kit
![]()
2006-2011 Cadillac DTS Weld-in Trunk Bracket
$225.00
|
![]() |
This is a weld in bracket that allows you to put the 2006-2011 Cadillac DTS Weld-in Third Brake on a different car. This kit has been installed on 1993-1996 Cadillac Fleetwoods and 1980-1992 Cadillac DeVille’s. Both look great. This kit will fit many cars with flat or nearly flat trunk-lids 43″ wide or wider. (bracket is 46″ but can be trimmed down).
What’s included in the Kit?
Below is a list of contents that are included with the kit.
- 1x – 16 Gauge, stamped out of unfinished carbon steel to exact OEM specs
- 1x – Red Wire for Power
- 1x – Black Wire for Ground
- 7x – M6 x 1.0 nuts are required to install light onto bracket
Installation Instructions
Things you will need
This kit requires expert body work for a successful installation. Ordering this kit, you probably already know that. Below is a list of supplies you will need to complete the installation.
Tools
- Grinder (Cutting Blades & Grinding Blades)
- Mig or Tig Welder
- Paint Gun
Materials
|
|
Preparation
- The bracket might have some light surface rust on it. Take a piece of 1000 grit sand paper and sand over the bracket to remove it.
- Make sure you have everything you will need to complete the installation to prevent timely delays.
- Remember the rule, measure twice and cut once. Take your time with measuring, marking and preparation. Taking your time and planning properly will save you a lot of time.
Notice
This manual follows the installation of the bracket on a 1994 Cadillac Fleetwood Brougham. Every car is different and may require different techniques for installation. An experienced body man should know how to properly install the bracket on any type of vehicle.
After you install this bracket please send a picture of the finished installation to [email protected].
Installation Instructions
Measure Bracket
Below are all of the measurements of the bracket. You should mark the center line of the bracket with a marker before you start the installation
A quick way to mark the center of the bracket is to locate the center hole. Draw a line on the bracket to mark it. You will also need to find the center of the trunk lid and mark that with a line. The lines on the bracket and trunk lid should match up when test fitting and when welding. It’s very important to center the bracket during installing. | ![]() |
|
Mark all measurements on the bracket; this will help you when you are installing the bracket. You will use these measurements to mark and mask the trunk lid before you cut it. | ![]() |
Measure and Mark Trunk
- Measure the trunk lid end to end and mark the center of the trunk with a line. This line should be longer and be bigger than the brackets size. This is so that when we cut out the section we can still see the line and line it up with the line we put on the bracket.
- Measure from the center line to the right, 23-1/8″ and mark a line.
- Measure from the center line to the left 23-1/8″ and mark a line.
- Once the center line, left side line and right side line are marked you need to measure and mark the top and bottom
- Measure 2-3/4″ from the trunk edge -> down and mark it. Do this on the left side and on the right side of the trunk.
-
Measure 2-1/4″ from the trunk edge -> up and mark it. Do this on the left side and on the right side of the trunk.
Mask and Cut Trunk
- Using masking tape, tape the 2 side lines you marked, measure the inside width between the side pieces of tape. It should be the width of the bracket which is 46-1/4″ .
- Tape the top side of the trunk lid, in the last step you measured 2-1/4″ from the trunk edge -> up on the left and the right side. The tape connecting the 2 marks should be as straight as possible.
- Tape the bottom part of the trunk lid, in the last step you measured 2-3/4″ from the trunk edge -> down on the left and the right side. The tape connecting the 2 marks on this should slope down in the center. You have to look at the bracket and eye this taping.
Remember: It’s best to make the cut out smaller then trim the trunk lid and/or bracket while you are test fitting the bracket. If you make the cut out too big it will be a lot more work to install the bracket.
- After all four pieces of tape are on. Mark the whole inside with a marker. This is in case the tape comes off while you are cutting out the section.
Test Fitment – Trimming Bracket and/or Trunk Lid
Test fit the bracket, it might be necessary to trim the bracket and/or the trunk lid for a flush fit. There should be 1/8″ of clearance all around the bracket and it should be pretty flush with the trunk lid cut out all the way around. Remember to keep the bracket centered by using the lines you marked on the bracket and trunk lid.
Tip: Use a flat earth magnet to keep the bracket in place while you are test fitting and making adjustments. These are available on eBay and they come in handy when doing custom body work. Also note the spacing of the bracket in this picture, the cut out should be as close to the bracket as possible.
Cut Access Ports
If you do not cut out the inner portion of the trunk lid you will need to add access slots. You need these slots to put the nuts onto the light when you install it, you will also need access for the wiring. Look at the light and the bracket and figure out where you need to put holes on the trunk. It might be easier to cut out a small slot the size of the light.
Weld in Support Tabs
This step is optional but we recommend it. We welded on 6 pieces of metal (small tabs cut out of the larger piece we just cut out). 3 on the top and 3 on the bottom at left, right and center. With these tabs in place and the earth magnet holding the bracket steady, welding on the bracket will be a lot easier.
The picture below shows the 2 support tabs on the left side of the trunk lid. If you cut everything out correctly then the bracket should have clearance all the way around the cut out and it has the possibility of falling into the cut out. Tabs will help keep it in place while you are welding.
Weld in Bracket
Tip: Before welding the bracket in place, spray paint the back of the bracket with a rust proofing primer to help the metal from rusting in the future. You can also primer it through the access holes or slot in the rear once it’s installed.
Weld the entire bracket in place. In the picture below, you can see the line in the center of the bracket. This line, lines up with the line we drew on the center of the trunk. It’s important to make sure the bracket is completely centered. Weld in a spot every 1/2″ so not to warp the metal.
Smooth Out Welds
After the bracket is welded in place, smooth out all of the welds with a grinder.
Bodywork
The next step is to bodywork. Use body filler, after it dries, sand it smooth.
Paint
After the bodywork is complete you can paint the entire trunk lid. If it’s done properly, then it should match your paint job perfectly and look like the light came with the car.
Light Installation & Wiring
The kit comes with 2 wires:
1x – Red Wire for Power 1x – Black Wire for Ground |
![]() |
|
The connectors of the wires will fit tightly over the pins on the light. You will have to use wire connectors on the other side to connect the light to the factory wiring. | ![]() |
|
Looking at the light with the bolt on the left side. The pin on the left is ground and the pin on the right is positive. The positive wire should be hooked up to a wire that activates when you press the brake light.
If you have a repair manual for the car this should be easy to figure out. If not you can test the wires going to the brake lights. |
![]() |
|
Once you plug in the wires they should fit nice and tight. I usually just plug them in and do not put anything to hold them in place and I have not had any issues with them coming loose. You can put some silicone or hot glue if you are worried about them coming loose. | ![]() |
|
Once the wiring is plugged up to the light you have to slide the wires though the hole in the trunk. Make sure the other side of the wired are accessible.
The positive wire should be hooked up to a wire that activates when you press the brake light. If you have a repair manual for the car this should be easy to figure out. If not you can test the wires going to the brake lights. You will have to use wire connectors on the other side to connect the light to the factory wiring. |
![]() |
The kit comes with 7x M6-1.0 nuts. If you lose any of them, you could find them sold at Home Depot or a hardware store.
After wiring is complete and TESTED. Then you should push the light in until the plastic tabs lock in place, you can see from the inside of the trunk lid to make sure they are in place. Then put the nuts on and secure the light in place. |
![]() |
As seen in Lowrider Magazine: